

The image from Downtown Diva is stamped with Memento Tuxedo Black onto Choice Snow White and coloured with copics. I cut it out using my Labels Two Nestabilities by Spellbinders. All the paper and ribbon are from the March Key Ingredients and the rhinestones are from the Mother's Day Key Ingredients. Have you signed up for your Key Ingredients subscription yet? I absolutely LOVE the Key Ingredients...coordinating products in one package...it's super easy to whip up projects using the Key Ingredients, and the subscription service is packed with extra value!
But wait a second...did you notice that there are two green and one blue rhinestone, in addition to the clear ones? Well, I discovered that you can colour your rhinestones with copic markers...so the green and blue ones started out as clear ones from the Mother's Day Key Ingredients.
Here's a tutorial I put together so you can build your own Receipt/Coupon Organizer...just in case there are other "black hole" purse carriers like me! :)
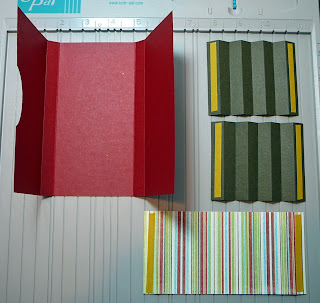
Start with a 6x9.75 inch piece of red cardstock. Score it at 3, 3.5, 6.5, and 7 inches. This will make the body of your organizer.

Next cut two pieces of brown cardstock to 3x4 inches. You'll score both of these every half inch, at .5, 1, 1.5, 2, 2.5, 3 and 3.5 inches. Then accordian fold both pieces...these will create your sides. I wanted the sides to be accordian folds like a file folder, so that the top would open up wider than the bott0m...easier to put receipts in and get coupons out.


Next I chose one of the striped cardstock pieces for the divider. It's cut to 3x6 inches and scored at half an inch from each end.

Then I used an oval punch on the red base piece, to create a little opening. Be sure you're punching the end panel that measures three inches, because the slightly smaller end is the one that creates the front flap.

Next add a strong adhesive to the ends of the accordian folded pieces and to the ends of the divider piece. Taylor's Sticky Tape would be perfect for this.
You'll adhere one end of the accordian fold piece to the inside of the front panel and the other end to the inside of the back panel. Repeat for the other side, then adhere the ends of the divider piece to each accordian piece.


To keep the front flap closed I added some self adhesive Basic Grey magnets. The easiest way to line them up is to adhere a magnet to the inside of the flap, take your second magnet and let it attach itself (magnetically) to the first magnet, then close your flap. Presto...magnets are aligned.

Then I added another of the patterned papers from the March Key Ingredients to hide the magnet on the front of the Organizer. I left the other magnet exposed for two reasons: 1) it doesn't really show except when I open the organizer. 2) I didn't want another layer of cardstock to take away the strength of the magnetic connection.

Once your Organizer is built you can decorate it to suit your Diva style!

For all the latest news, information and inspiration, don't forget to sign up for the Taylored Expressions Newsletter. You'll find the link on then left sidebar of the TE Store homepage.
Thanks for stopping by!
Karen


20 comments:
NO WAY! This is BEYOND fabulous Saucy! I cannot even stand how AWESOME this is! I am totally going to make one of these! THanks for such a FUN and useful tutorial!!
This is awesome. I was planning on making myself a coupon holder...now I can!!!
Very clever!!!!
Jan Castle
This is awesome, Karen! I am SO going to make one of these. . .I'm always losing my diaper coupons! LOL
This is SO clever!! You will get a ton of compliments each time you pull this out of your purse to use your coupons - how fantastic! And you can color rhinesones? Get out!!! I'm so doing that today. You are one creative lady!
OMG, it's SO cute! You are SO creative!!
Holy Fantabulous! This is great!!! This is the perfect gift for my Diva GF's!!! You totally rocked this!
this is AWESOME!! WOWZA, girl! tfs with us
Wow this is awesome! I need one!
Fantastic! Thanks for the awesome instructions!! Can't wait to create one for myself!
OMG, you're AWESOME! I LOOOOOVE this!!
super adorable! and how can you go wrong with shopping cuppies?! :)
Karen, this is so cute. Guess who is going to make one this weekend, me. You are amazing.
Nicky
I have wanted directions for one of these and I have looked everywhere. This is awesomely fantastic.
Thank you so much!
Bonnie
Absolutely fabulous -- it's both darling AND practical! Thanks for the tutorial too!
Karen! This is ADORABLE! You've SEEN my purse and know that its the black hole. I'm making one of these!
Oooh! I am SO making this!!!
I LOVE this Karen! what a super creation - I'll be making this for sure - thanks for the wonderful tutorial!!
Thank you, thank you, thank you! I'm adapting this pattern to use to make a receipt holder for christmas. This will be my office gift for my 40 coworkers. I've been trying to make one for 3 years. LOL. I really appreciate your sharing.
Post a Comment