Showing posts with label Tutorial. Show all posts

Tuesday, September 8, 2009

Potion Bottle Gift Box & Tutorial

Hi there! It's Laurie here, & I'm back to share with you a project complete with tutorial! I created a potion box holder for this past release (you can see the photo below) and I've received several requests for the template. Well, instead of a template I thought I would share with you a mini-tutorial! :-)


This was the gift set that I shared last Saturday for the release. I used the goodies included in the Punchy Potion Bundle.

I'm going to share directions on how to make the potion bottle box.


You'll need a piece of card stock measuring 5" x 11", two pieces of patterned paper measuring 3 1/4" x 3", two pieces of patterned paper measuring 1 1/2" x 3", a piece of c.s. cut out with a shaped die, a piece of patterned paper cut out using that same die (or a smaller version of the die), a decorative brad, & some 1/4" Sticky Tape. *Note: I used a Sizzix die for this box and just trimmed the patterned paper piece a bit smaller than the black one, but any of the Nestabilities Label dies would work wonderfully (with no need for trimming :-)!


With your card stock placed horizontally (as pictured above), score at 1 3/4", 5 1/4", 7", & 10 1/2". Turn card stock 90 degrees and score at 1 3/4". I made my score lines white only so they would show up in the photo. :-)


Using a bone folder (or something similar) crease each score line well. Then, holding your card stock horizontally (as pictured above) make vertical cuts along each score line on the bottom section (see photo above). The 1/2" little flap on the right side is not needed and I just cut mine off. Next, apply sticky tape to the 1/2" flap on the right side and one of the bottom flaps as pictured above.


After assembling your box, add the patterned paper pieces, die cuts to the top, and decorative brad. I used items from the Halloween Key Ingredients kit (Basic Grey Eerie patterned paper and Halloween brad)!

For added "spookiness", I ink distressed all of my patterned paper pieces using some dark gray ink.

Don't forget to check out all of the FANTASTIC Birthday Bash Challenges still going on (scroll down to see them all)!! Each of the Baker's Dozen DT girls have hostessed a challenge and there are FAB*U*LOUS prizes being give away!!

Thanks for stopping by today! ~Laurie

Tuesday, June 2, 2009

Tissue Holder and Tutorial...

Hi everyone! Laurie here, and I've got a fun little project to share...with a tutorial! During the May's release Sneak Peeks, I shared THIS tissue holder that I made with the new Doctor's Orders set. I received many requests to share a tutorial, so here it is! :-)


To start, you will need a piece of cardstock that measures 4 5/8" x 8" and another piece that measures 4 1/2" x 6 1/2".


First, you will need to score both pieces of cardstock. The 4 5/8" x 8" piece needs to be scored at 1 1/2", 2 5/8", 5 1/4", & 6 3/8" (make sure that the c.s. is horizontal).


Score the smaller piece of c.s. at 1" on all four sides as shown in the picture below.


Using a bone folder, crease each fold well (this makes for a neater box).


Next, make four vertical slits to create little "flaps" in each corner as shown in the picture below.


This next step is optional, but one that I think makes for a nicer end product. Cut part of each flap off (making diagonal cuts) as shown in the picture below.


Finally, assemble boxes using strong adhesive (like Taylor's Sticky Tape) and place a small folded ribbon on one end of the bottom box (this will be the ribbon pull that is used to open the box).


For my finished box, I placed a piece of layered and decorated c.s. measuring 4 12" x 2 1/2" on the top. The adorable tissue box (from Doctor's Orders) is stamped on Choice Buttercream c.s. and colored in with Copics. The decorative layer underneath the tissue box was created using my Labels Four Nestabilities. For embellishments, I added some Stickles and buttons!


That's it! I hope you find these instructions helpful! ~Laurie

Thursday, April 16, 2009

Mother's Day Surprise


Hello everyone! With Mother's Day right around the corner, I thought it would be fun to put a little project together for my kids to give to their Grandmas next month. I'm using elements from the Mother's Day Key Ingredients kit since it's already coordinated for me! You can click on any photo to see a larger version of it.

Generic supplies you will need:

1 pop-top can
safety can opener
candy or another filler
sticky tape
scissors
stamps
ink
scallop punch or die cut
crystal effects (or another strong glue)
cardstock/patterned paper
embellishments


Open the can with a safety can opener from the bottom. Pour out the contents and be sure to clean it out and dry it completely.

Cut your patterned paper or cardstock to fit the height and circumference of the pop-top can. Add sticky strip to the can, top to bottom, and to the inside of your paper.


Peel the backing off the sticky strip on the can and apply the paper, then peel the backing off the sticky strip on the paper to create a smooth seam.


Fill the can with your goodies - I would recommend putting them in a baggie so the glue doesn't ooze all over the candy, or use individually wrapped candy.


Use crystal effects or another strong glue and apply a steady strip of glue around the outside of the bottom you removed earlier. Press it back onto the can and be sure to hold it in place for a good 30 seconds.


Now is the fun part! Add embellishements - I'm using silk flowers and ribbon from the Mother's Day Key Ingredients kit as well as Savannah buttons for mine.


I also added strips of scalloped paper to the top and bottom of the can. To hide the "how to open this can" instructions (this makes me laugh!), cut out a circle that is big enough to cover the wording. To get the paper to fit underneath the pop-tab, use a 1/2" circle punch and cut the paper to fit.


Now you will be able to slide the paper right under the tab. You can decorate the lid here or skip to the next step.


This is an optional step if you choose to cover the tab. I stamped the sentiment and flower from Fresh Flowers onto my scalloped circle and used Copic markers. I added the button and some Flower Soft to the center of my flower. The scallop is popped up with dimensional tape.


Now it's your turn to try - have fun with this!
Don't miss out on all of our fun projects - sign up for the Taylored Expressions Newsletter. You can find the link on the Taylored Expressions homepage.

recipe -
stamps: fresh flowers
paper: mother's day key ingredients
ink: memento rich cocoa, copic markers
accessories: silk flowers, satin ribbon (mother's day key ingredients), savannah bag o buttons, flowersoft, silver brads, flower punch, circle scallop nestabilities, scallop edge punch, mini glue dots, sticky strip, crystal effects, dimensional tape

Thursday, April 9, 2009

A Diva's Receipt/Coupon Organizer

I'll admit it...I'm one of those people who shoves receipts and coupons into the black hole, otherwise known as my purse, never to be seen or used again. I'm organized for some things, but definitely not for receipts and coupons. As soon as I saw the Downtown Diva set I KNEW I needed to make myself an organizer to keep in my purse. So here's what I came up with! 


The image from Downtown Diva is stamped with Memento Tuxedo Black onto Choice Snow White and coloured with copics. I cut it out using my Labels Two Nestabilities by Spellbinders. All the paper and ribbon are from the March Key Ingredients and the rhinestones are from the Mother's Day Key Ingredients. Have you signed up for your Key Ingredients subscription yet? I absolutely LOVE the Key Ingredients...coordinating products in one package...it's super easy to whip up projects using the Key Ingredients, and the subscription service is packed with extra value! 

But wait a second...did you notice that there are two green and one blue rhinestone, in addition to the clear ones? Well, I discovered that you can colour your rhinestones with copic markers...so the green and blue ones started out as clear ones from the Mother's Day Key Ingredients. 

Here's a tutorial I put together so you can build your own Receipt/Coupon Organizer...just in case there are other "black hole" purse carriers like me!  :)

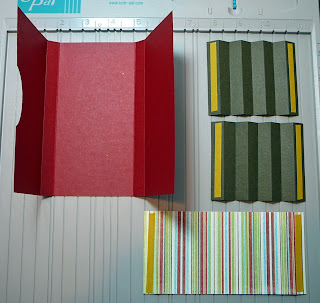
Start with a 6x9.75 inch piece of red cardstock. Score it at 3, 3.5, 6.5, and 7 inches. This will make the body of your organizer.

Next cut two pieces of brown cardstock to 3x4 inches. You'll score both of these every half inch, at .5, 1, 1.5, 2, 2.5, 3 and 3.5 inches. Then accordian fold both pieces...these will create your sides. I wanted the sides to be accordian folds like a file folder, so that the top would open up wider than the bott0m...easier to put receipts in and get coupons out.

Next I chose one of the striped cardstock pieces for the divider. It's cut to 3x6 inches and scored at half an inch from each end. 

Then I used an oval punch on the red base piece, to create a little opening. Be sure you're punching the end panel that measures three inches, because the slightly smaller end is the one that creates the front flap. 

Next add a strong adhesive to the ends of the accordian folded pieces and to the ends of the divider piece. Taylor's Sticky Tape would be perfect for this. 

You'll adhere one end of the accordian fold piece to the inside of the front panel and the other end to the inside of the back panel. Repeat for the other side, then adhere the ends of the divider piece to each accordian piece. 

To keep the front flap closed I added some self adhesive Basic Grey magnets. The easiest way to line them up is to adhere a magnet to the inside of the flap, take your second magnet and let it attach itself (magnetically) to the first magnet, then close your flap. Presto...magnets are aligned. 

Then I added another of the patterned papers from the March Key Ingredients to hide the magnet on the front of the Organizer. I left the other magnet exposed for two reasons: 1) it doesn't really show except when I open the organizer. 2) I didn't want another layer of cardstock to take away the strength of the magnetic connection. 

Once your Organizer is built you can decorate it to suit your Diva style! 
For all the latest news, information and inspiration, don't forget to sign up for the Taylored Expressions Newsletter. You'll find the link on then left sidebar of the TE Store homepage. 

Thanks for stopping by!
Karen 

Wednesday, February 18, 2009

A Twinkles St. Paddy's Day


Hi All! So, today I have a very Twinkley card and mini tutorial to share. I recently received some of Taylor's Tiny Twinkles and instantly fell in love. I love these little rhinestones because they add the perfect touch to every card. I decided to create a mini tutorial on how I like to adhere them to my cards. I am sure there are many different ways to apply them but this way seems to work perfectly for me. For this card I used the St. Patrick's Day image from the Year of Sweets 1 set. I started by stamping and coloring in my image on Choice Snow White card stock. Then, I pulled out my tweezers and Tumbow adhesive. I squeezed a drop of glue on some scratch paper and then using my tweezers grabbed a twinkle tot and dipped it in the glue. I tried to add just a touch of glue since that is all you need. If, the twinkle doesn't come right of the tweezer just use your fingernail to slide it off. I really find these rhinestones easy to use and perfect for adding a WOW factor to your card. Well, I hope you found this mini tutorial helpful. I can't wait to start seeing everyone's cards and projects using Taylor's Tiny Twinkles.
Until next time,