To start, you will need a piece of cardstock that measures 4 5/8" x 8" and another piece that measures 4 1/2" x 6 1/2".

First, you will need to score both pieces of cardstock. The 4 5/8" x 8" piece needs to be scored at 1 1/2", 2 5/8", 5 1/4", & 6 3/8" (make sure that the c.s. is horizontal).

Score the smaller piece of c.s. at 1" on all four sides as shown in the picture below.

Using a bone folder, crease each fold well (this makes for a neater box).

Next, make four vertical slits to create little "flaps" in each corner as shown in the picture below.

This next step is optional, but one that I think makes for a nicer end product. Cut part of each flap off (making diagonal cuts) as shown in the picture below.

Finally, assemble boxes using strong adhesive (like Taylor's Sticky Tape) and place a small folded ribbon on one end of the bottom box (this will be the ribbon pull that is used to open the box).

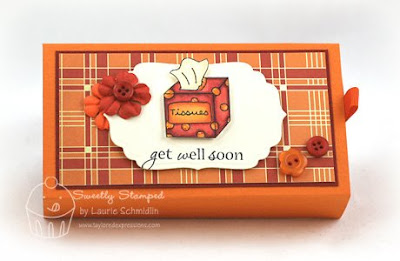
For my finished box, I placed a piece of layered and decorated c.s. measuring 4 12" x 2 1/2" on the top. The adorable tissue box (from Doctor's Orders) is stamped on Choice Buttercream c.s. and colored in with Copics. The decorative layer underneath the tissue box was created using my Labels Four Nestabilities. For embellishments, I added some Stickles and buttons!

That's it! I hope you find these instructions helpful! ~Laurie


18 comments:
Very fun Laurie! I can't wait to make one. what is the size of the smaller sheet of paper?
Very cool! Love the tutorial!
Love the colors!!
Oh, and your coloring. *grin*
Very cool tutorial - THANKS!
~Meredith
Get out Laurie! This is so cute!!! Fantastic idea and thanks so much for sharing the measurements!
This is fabulous, Laurie!! Thank you for the wonderful tutorial!!
what a wonderful idea!
Oooh! I've done something like this before, but mine was all one piece. I'll DEFINITELY be CASEing this! Your colours are GREAT! TFS.
Great tutorial, thanks for sharing. I will definately be trying this one out, there are so many possibilities for it.
Laurie, I admired this on your blog a while back and I'm sooooo happy you've done a tutorial! Thanks so much - I can't wait to make one!
Hugs,
Aimes
x
Great tutorial, Laurie! Thanks so much!
This is so fantastic! GREAT idea :D My hubby gets sick a lot, so next time I'm totally making him one! Thanks for the awesome tutorial :)
LOVE this Laurie! What a super awesome idea and I LOVE your coloring on the tissue box! I am SO making one (or two!) of these!!!
Love your coloring, Laurie! Awesome!
ADORABLE, Laurie! Too too cute!
This is great!! Thanks for sharing!!! I see myself making a bunch of these this upcoming cold season.
What a wonderful idea and great for a sick friend! Thanks for sharing.
Love this! Thanks for sharing!!
Post a Comment