Showing posts with label Frightful Night. Show all posts

Saturday, September 5, 2009

TEBB Challenge #3 Hosted by Donna

Good morning Taylored Expressions/Cuppie Fans!! We’re so excited you’re joining us for the Taylored Expressions Birthday Bash! We’ve got so many fun challenges planned for you today and lots of SWEET prizes to celebrate Cuppie’s 1st Birthday!

A new challenge will be posted each hour by our fabulous Baker’s Dozen design team! We’ll have a variety of challenges including sketch, technique, color, and inspiration. You’ll have 5 days to complete these challenges and be eligible for the prizes. It's also o.k. to combine a few of the challenges so you don't have to make 13 cards (unless you really want to!) *wink*


My challenge is the first TECHNIQUE challenge of the day; I am a HUGE fan of the of paper-piecing your line art images, it gives you a FUN, easy option in lieu of coloring. All you do is pick out your patterned papers to coordinate with the rest of your supplies for your card or project. Then, you will stamp your image on your card layer directly, then stamp your image directly on the patterned paper and cut out on the line or just inside the line for a perfect fit, because then you glue your pattern piece onto your stamped layer.

So what do you need to do to participate?

CHALLENGE: Pick out your stamp set and pattern papers and follow the directions above if you've never tried this technique before. You’re not required to use Taylored Expressions images for our challenges, but if you got 'em, you may as well use 'em!

Here is the card I made for this challenge - I brought out one of my favorite Cuppies from last year's Trick or Sweet set illustrated by Jessie Oleson, dracula and he is standing in front of his spooky house from Frightful Night, also a release from a year ago. What I love about these sets is they never get old - they were JUST as FUN to use this week as they were LAST YEAR! That speaks VOLUMES to me as a consumer!

FUN PAPER-PIECING TIP: Since I planned on using the technique so it became a purple spider-web house compliments of the Basic Grey Eerie designer paper in the Halloween Key Ingredients! I did not have to mask the house after I stamped it so I could sponge in the spooky night sky, isn't that great? What I did do, though was make a few extra stars & a moon by using a watermark pen on the paper and embossed with clear embossing powder, the ink would 'resist' those areas and stay white.

Now you see how the house fit in perfectly on the background and it looks great, huh? I also want to point out to you the attic window on the house. You will notice it is not cut out and colored in with light in the windows like the others. That is because no one was hanging out in the attic that night. That's a place strictly for storage of non-Halloween decorations, like Christmas decorations. (that's my truthful explanation for having not realized I forgot to cut out the window until AFTER I had already made & photographed my card-HA!) Now you know I'm not perfect, nor do I ever claim to be. This card was a lot of work and I put my heart into it and did not have time to make another one. I hope you still like it & would be proud to own it if you win!

ANOTHER PAPER-PIECING TIP: In order to make dracula's cape look like it was really OVER his cupcake liner, I paper-pieced both with the purple designer paper. Then, I paper-pieced the cape with the polka dot paper so it was on top. It creates a more fluid and realistic effect.
KEYWORD: Upload your creation to your blog or online gallery (or both). If you’re uploading to online galleries, use the keyword TEBBDB. Then come back to this challenge and leave a comment with a direct link to your creation! In order to be eligible for the prizes, you must leave a comment with a link to your card by midnight PST Wednesday, September 9th.

PRIZE: I will choose my favorite creation from among all the participants and mail you the card I created for this challenge along with a $10.00 gift certificate to the TE Store!

GRAND PRIZE: One random person who participates in ALL 13 of our Birthday Bash challenges will receive a $50 gift certificate to the TE Store in addition to an 8x10 custom watercolor Cuppie painting by our very own Jessie Oleson! Click here to check out all of Jessie's adorable artwork at her Etsy Shop. Once you complete and link all 13 challenges, send an email to tayloredexpressions@gmail.com to be eligible for our grand prize! Just include your name and “I completed all 13 challenges!” HOW AWESOME IS THAT?!
HAVE FUN & GOOD LUCK!

Thursday, July 30, 2009

Perfect Package Halloween Set


Hi everyone! Today I want to show you a set of Halloween cards that I made for my Mom using the Frightful Night set and a Perfect Package Card Box. If you haven't seen Taylor's video tutorial yet on how EASY these boxes fold together, check it out here.

The DP and Cobalt Prism paper is from last year's Key Ingredients kit...I soooo love these colors! The tree, bats and sentiments were all stamped in black craft ink and heat embossed with clear embossing powder. The large frame on the front of the box was cut with my Spellbinders Polka Dot Frame that I got from Taylor. Can you see the dry embossed polka dots? Here's a close-up:


The cards measure 4" square. I made a total of six, three cobalt and three pumpkin. The tree panels on the cards were cut with deckled rectangle Nestabilities. The sentiments on the cards were cut with the smallest deckled mega rectangle die. The black polka dot ribbon is also from Taylor's store. Here's a picture of just the cards:


SUPPLY LIST ~
Stamps: Taylored Expressions Frightful Night
Paper: Prism Vibrant Cobalt, PTI True Black, PTI Select White, SU Pumpkin Pie, Doodlebug DP
Ink: Black Craft
Accessories: Black Polka Dot Ribbon, Bow Easy, Spellbinders Polka Dot Frame, Spellbinders Deckled Rectangles, Spellbinders Deckled Mega Rectangles, Clear Embossing Powder, Perfect Package Card Box
Technique: Heat Embossing, Dry Embossing
Card Size: 4" Square

Don't forget...If you haven't yet signed up for the Taylored Expressions newsletter, stop by the homepage and add yourself to the list.

Thanks for stopping by and have an awesome day!
Denise

Monday, October 20, 2008

Lots of Candy!

I'm having so much fun reading all the comments on the SASI Sweet Treats post below - it's great to know there are people out there reading and loving this SASI blog! :) There's still time to enter to win the goodies. Just scroll down a couple of posts for the details and leave us a comment.

While all of us at TE/SASI are gearing up for Christmas and the new release coming up this week, I wanted to share at least one more Halloween project that I've been working on for awhile. What's the first thing you think of when you think of Halloween? Ghosts? Haunted Houses? Jack-o-lanterns? Heck no! The first thing we all think of is CANDY!!! ;) I wanted to come up with several different fun candy presentations that you might be able to use for party favors or classroom treats or even little treats for your co-workers.

I've created four different coordinated candy treats along with a mini card (2.75" x 4"). I started out with the cat image from Frightful Night. I stamped and embossed him several times using black craft ink and clear ep on Green Galore cardstock. Then I punched the images out with a 1 1/4" circle punch. The cat images were layered onto either Pumpkin Pie or Elegant Eggplant 1 3/8" circles and then onto Black scallop circles. Stickles were added to all the scallop circles (either orange or black diamond). Unfortunately the stickles don't show up in some of the photos, bet they sure do IRL! Everything was made with the four colors (Black, Green Galore, Elegant Eggplant, Pumpkin Pie) of cardstock along with dp and ribbon from the TE Halloween Key Ingredients Kit. I just love that fun paisley patterned paper.

Here are some close-ups of the different candy treats. First the peppermint patty package. Four York peppermint patties were decorated with the scallop circles and then attached to a 4" x 4.5" Pumpkin Pie cardstock panel. That was then slipped into a clear envie and a simple topper (using the bat image stamped in black) was attached. These are one of my favorite treats to make and they work for any season or holiday. Hmmm...maybe they're my fave because I love peppermint patties?


The idea for this acetate treat box came from the Technique Lover's Challenge on SCS hosted by Lynn Mercurio. You can see the box tutorial in that thread by clicking here. I started by scoring my acetate and then carefully stamping images from Frightful Night in Jet Black Stazon Ink. You have to be patient to let the ink completely dry before continuing on with the construction of the box. I had a partial bag of special edition Indiana Jones mint M&M's left over from before I started my diet and I loved the way the greens complimented my project. Of course now there are cool Halloween M&M's available too.


Next comes my Pixie Stick treat. I just had to have Pixie Sticks for this project - such fond childhood memories. Ahhhh...the pure sugary goodness! When I was trying to decide how many PS I wanted to put into my treat holder I checked the serving size on the back of the bag. Turns out 7 Pixie Sticks constitute *a serving* (who knew?) and it's only 60 calories! If I ate 7 Pixie Sticks now I think I'd fall into a sugar coma, but maybe that's seems more reasonable when you're a kid! LOL!

To make this treat holder I just played around with some measurements and scoring and ended up with an Eggplant panel 5" x 4.5". It's scored at 1.25" and 1.5" and again at 3.5" and 3.75". Then it's scored at .5" up from the bottom and snipped to be able to fold into a little box of sorts. Super simple. I have a whole bag of Pixie Sticks so I guess I better get busy making some more of these of the treat boxes!

The last treat container is a tin for Mini Tootsie Pops. The tin is just one of the international coffee tins covered in the paisley dp. I think this would be great to have on your desk at work as a fun way to share a little something sweet with your co-workers.

I hope you've gotten some ideas you can use for last minute Halloween treats or maybe you can start early and adapt these into Christmas treats. You know we're all about the sweets around here!
Be sure to tune in tomorrow for Taylor Tuesday - you just might get a little peek of things to come!

-Jami

Wednesday, October 8, 2008

Blackberry Candy Twists

Hi everyone!

I picked up these blackberry candy twists at Target and thought they'd be cute as giveaways at a costume party DH and I are going to in a few weeks. I made the card for our friends that are hosting the party. It coordinates with the candy wrappers.

Card:

All stamps are from the Frightful Night stamp set. The tree was stamped onto Vellum cardstock with Versamark, then I sprinkled on some heat and stick powder, heated it with a heat gun to activate the stickiness, sprinkled on some of Taylor's Black Ice glitter, and then heated it again to set the glitter. This is called the Glitter Surprise technique...it was one of the SCS Technique challenges a couple weeks ago. The bats on the white angled panel were done the same way. The layout started off as Taylor's TECC36 sketch from this past Friday.....but it turned into something completely different by the time I was finished.

The Vellum was attached to the black mat panel with the black brads from Taylor's Halloween Key Ingredients pack. The black mat panel behind the tree, orange mat panel, and punched sentiment are all up on separate layers of dimensionals. The bats on the black panel were stamped in Versamark and heat embossed with black embossing powder. The ribbon is from Taylor's Birthday Girl Key Ingredients.

The inside panel is white with some more heat embossed black bats down in the corner, stamped on a black angled piece of CS.

Candy Wrapper:

The black scallop wrapper that covers the candy twists was done using one of my largest scallop circle Nestabilities. I added a thin strip of sticky strip along the bottom to hold the bottom row of candy in place, folded the scallop wrapper up around each side, and tied it with Taylor's ribbon. The bats are from the Frightful Night stamp set. They were stamped in Versamark and heat embossed with black embossing powder. The white oval was punched with a scallop oval Nestabilities die.

CARD RECIPE ~
Stamps: SASI Frightful Night
Paper: Pumpkin Pie, White, Basic Black, Vellum
Ink: Versamark, Versafine Black Onyx
Accessories: Ribbon, Brads, Black Ice Glitter, Black Embossing Powder, Dimensionals, Word Window Punch
Technique: Glitter Surprise, Heat Embossing

CANDY WRAPPER RECIPE ~
Stamps: SASI Frightful Night
Paper: Basic Black, White
Ink: Versamark
Accessories: Ribbon, Scallop Oval Nestabilities, Scallop Circle Nestabilities, Sticky Strip, Black Embossing Powder
Technique: Heat Embossing


Thanks for visiting the SASI blog today!

Wednesday, September 17, 2008

Happy Tree

As soon as I saw the set Frightful Night I started thinking about non-Halloween ways to use it. I knew the house would be super versatile, but the more I thought about it the more I realized the possibilties with images other than the house as well.


For this 6.25" x 3.5" card I wanted to create a happy little scene. The house is watercolored with SU watercolor crayons and an aquapainter and then the brick mortar was drawn in with a gray Copic marker. There is Crystal Effects covering the windows for shine and dimension. See those cute little orange flowers? Those were actually my hubby's idea! I used one of the stars that comes attached to the house image to create the flowers and I hand drew in the stems and leaves. I cut all three stars off the house image to use them separately. A little tip if you decide to do the same - you do not need to trim them super close because the SASI rubber is so deeply etched you will not have much problem with catching edges. I actually trimmed mine a little too close and they are so small that there's barely enough cling mount to stick to my acrylic blocks. LOL! Live and learn!

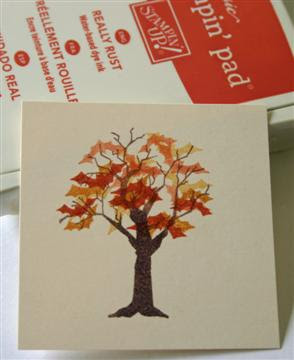
Now what about those trees? Have you figured out how I made the leaves? Yep - the leaves are made with the image of the three bats! How cool is that? I'm not usually one to *think outside the box* like that so when I came up with this idea I was totally bouncing out of my chair! I've made up a quick tutorial using fall colors to show you how to make a tree for any season that's not scary at all using that haunting tree image from Frightful Night.

Step 1: ink up the tree with Close to Cocoa ink and use a Chocolate Chip marker to just darken just the lower portion.


Here's how the tree image looks stamped onto Poison Ivory Shimmer cardstock.


Step 2. Starting with More Mustard ink stamp the bats once full strength and again without inking up the stamp again. This will give you some dark and some light leaves. Then turn the bat image upside down and repeat being sure to vary where you stamp light and where you stamp dark.


Step 3. Repeat the above with Really Rust ink. Now it's starting to look an Autumn tree.


Step 4. Repeat the above with Ruby Red filling in as needed. Since Ruby Red is the darkest color I stamped it the least amount of times. After the Red I went back in with the Mustard and filled in a couple of spots. Now you have a Fall tree. Complete your card as desired.


Here's my finished card using SU dp Apple Cider along with the pumpkins from Loads of Love Accessories and a beautiful verse from the retired SU set God's Way.


And you have to also see the Fall tree that Sharon Harnist created with just the tips of her Copic markers - check it out here. Very cool Sharon! My challenge to you is to create a card or scrapbook page using the tree from Frightful Night in a totally non-scary way! Let's see what you can come up with. Post your creation to the SCS gallery with 2 keywords (with a comma in between) - SASI, SASItree. Bonus points (LOL!) for using other stamps from that set in new or different ways!

Here are some other examples of Happy non-haunted houses from the Baker's Dozen:

From Our House to Yours

Greetings

Change of Address

Fall House

A note about uploading Stamp a Sweet Impressions creations to SCS - there is now a company gallery listed for Taylored Expressions. ALL the company galleries are completely keyword driven, so to make sure your uploads shows in the TE Gallery please be sure to use the keyword SASI. There are other keywords that also work, but SASI is the simplest most sure-fire one to use.

Thanks for stopping by. Have a sweet day!

-Jami

Wednesday, September 10, 2008

A Ghoulish Globe

Have you seen all of the wonderful creations by the Baker's Dozen using these adorable Stamp a Sweet Impression stamps found exclusively at Taylored Expressions? You don't want to miss them!

Today, I've created something a little different. I know Halloween is all about candy, but it can't be at our house since my eldest daughter has severe peanut/nut allergies. Of course there are certain candies that she can have, but what's more fun than something you can actually play with? I created this little "Ghoulish Globe" for my daughters. It was a snow globe, but I dumped everything out and put some "ghostly" confetti in it along with some googly eyes! It was difficult to get a good picture of this with the glare, but hopefully you can see the ghosts and googly eyes in the globe. The girls LOVE it and I'm sure your little "goblin" will too! ;) Stay tuned for other unique projects from the rest of the Baker's Dozen! SUPPLIES USED: Stamps: Frightful Night (Taylored Expressions); Paper- Halloween Key Ingredients (Taylored Expressions); Ink- Onyx Black (Versafine); Accessories- brads (Halloween Key Ingredients, Taylored Expressions), Copic markers, googly eyes